.jpeg)
If you’re building websites in Webflow and running marketing or sales in HubSpot, you’ve probably wondered how to connect these two. On one hand you have Webflow that gives you design freedom and clean, fast front-end code. On the other, there’s HubSpot that handles all of your contacts, workflows, and marketing initiatives. The connection is there, but you need a way to make them work together.
After seeing plenty of teams spend hours trying to make these two talk, we know there’s a better way of using both together. It’s Webflow HubSpot integration that combines a flexible website with a centralized marketing system. But this integration requires careful setup to work smoothly, and this is what we are going to explore in this article.
Why Integrate Webflow with HubSpot

When you look at Webflow and HubSpot tools, you can see that they serve different, but very complementary purposes. In practice, you probably know that a website without marketing is just a pretty picture on the wall, while marketing without a website doesn’t mean much.
Connecting Webflow and HubSpot enables key features, including:
- Centralized CRM: Everything a potential customer does, fills a form, chats, or clicks something, gets saved automatically in HubSpot.
- Automated follow-ups: HubSpot can send messages or emails to leads by itself, so you don’t have to do it manually.
- Analytics and attribution: You can see which ads, pages, or forms actually bring in customers, instead of guessing.
- Personalization: HubSpot remembers info about your visitors and can show them content that matches their interests.
Some of the common ways this plays out in practice include:
- Capturing leads: When someone fills out a form on your Webflow site, their info goes straight into HubSpot automatically.
- Embedding chat: You can put HubSpot’s chat box on your Webflow pages so visitors can message you anytime.
- Automating deals: When a lead fills a form, HubSpot can create a deal for you automatically, no manual entry needed.
- Keeping forms in sync: If you have the same form on different pages, HubSpot makes sure all the info stays correct and nothing gets lost, but only if you use an embed.
This synergy between Webflow and HubSpot gives you space, freedom, and a win-win combination. Since you’re not forcing both of them into one single platform, but you integrate, it keeps your front end flexible while letting this marketing tool do what it does best.
Main Integration Options
There isn’t a single “right” way to connect Webflow and HubSpot. The method you choose depends on what you need from the integration, what your team’s technical skills are, and how much control you want over data flow.
Using the Official HubSpot App for Webflow
Webflow App for HubSpot is the easiest way to start getting leads from your Webflow site into HubSpot. If you’ve never connected the two before, think of this as the starter kit.
- Map Webflow form fields to HubSpot properties.
- Deploy HubSpot tracking code across your site.
- Add chat widgets and other HubSpot assets without custom code.
This method works well for small to medium sites with basic forms only. It does not support conditional fields, progressive profiling, or smart fields.
Embedding HubSpot Forms Manually
This approach gives you full control over HubSpot functionality and styling if you use the raw HTML embed option instead of the default iframe. If you need forms with HubSpot-specific tools like conditional fields, progressive profiling, or smart fields, embedding them directly on your site is the way to go. This involves:
- Building the form inside HubSpot.
- Using the “raw HTML” or developer code option to generate the embed.
- Paste that code into a Webflow Embed element.
- Styling it with your Webflow classes or custom CSS.
If you like tweaking settings and digging into the details, this one’s for you. If not, start with the app and grab a coffee instead.
Connecting via APIs or Automation Tools (Zapier, Make)
For anything more advanced than simple form submissions, you need middleware or a custom API setup. This is what you’d use for things like routing leads based on conditions, syncing several systems at once, or sending data from dynamic Webflow content into HubSpot.
- Zapier handles simpler, linear workflows, but adds an extra layer of dependency; if Webflow or Zapier goes down, submissions can fail. Costs scale with task volume.
- Make (formerly Integromat) is better for advanced, multi-step workflows or conditional routing. It relies on webhooks to capture submissions in real time before sending them to HubSpot.
This layer adds flexibility but also increases maintenance, you now have to monitor three systems: Webflow, middleware, and HubSpot.
Enterprise-Level Integration Setup
For large or high-volume sites, custom API integration is the only reliable way to achieve bi-directional sync, CMS-to-Custom Object mapping, and real-time personalization.
This allows:
- Bi-directional sync of contacts and content.
- Mapping Webflow CMS items to HubSpot Custom Objects.
- Real-time personalization based on CRM data.
Implementation usually uses serverless functions like Node.js or AWS Lambda that handle Webflow submissions, format the data, and send it to HubSpot. You can also pull HubSpot data back into Webflow to update CMS content dynamically.
When it comes to enterprise setups, they are more complex and expensive, but they give full control, scale reliably, and support. Also, it includes sophisticated personalization or automation workflows that simpler methods can’t handle.
The Official HubSpot App for Webflow

If you want a quick, supported way to connect Webflow and HubSpot, the official app is the easiest place to start. It’s built for simple lead capture and basic integration, letting you manage forms, tracking, chat, and CRM sync without any coding. For lots of sites, this is enough to get data organized and marketing automation running.
Overview and Capabilities
Once installed, the app covers several key areas:
- Forms: Map Webflow form fields to HubSpot contact properties.
- Assets: Import HubSpot CTAs, images, and videos into Webflow.
- Tracking: Automatically deploy the HubSpot tracking code site-wide.
- Chat: Place HubSpot chat widgets on any page.
- CRM Sync: Submissions and user interactions flow into HubSpot in real time.
It’s a solid starting point for most marketing sites, especially if you don’t need complex conditional logic or high-volume workflows.
How to Install and Authorize the App
- Go to the Webflow Marketplace and find the HubSpot app.
- Install it on the Webflow site you want to connect.
- You’ll be prompted to log in to HubSpot and authorize the required scopes.
- Once authorized, the app appears in Webflow’s Designer under the Apps panel, ready for configuration.
This process sets up the foundational link between your site and HubSpot so you can start mapping forms, deploying assets, and tracking users.
Mapping Existing Webflow Forms to HubSpot
If your site already has Webflow forms, the app lets you map them to HubSpot contact properties:
- Publish or republish the page containing the form.
- Test a submission to ensure it reaches Webflow.
- In the Apps panel, select the form and map each Webflow field to the corresponding HubSpot property.
A pro tip: Every Webflow form must have a unique name, especially on dynamic templates or copied forms, or mappings can break and cause duplicate submissions. A naming convention like {PageName}-{FormPurpose} works well. Also, don’t panic if it looks wrong at first, CSS and HubSpot embeds sometimes play hard to get.
Adding HubSpot Assets, Tracking, and Chat
Once the app is connected, you can:
- Enable HubSpot tracking site-wide without manually pasting code.
- Add chat widgets through the app interface or embed code.
- Pull in CTAs, images, and other media from HubSpot into your Webflow project.
These features rely on the tracking script, so verify it’s firing properly to ensure forms and chat function correctly.
Managing Connected Forms and Uninstalling
The Apps panel also lets you manage your connected forms, you can edit how fields map, remove a form, or disconnect the integration completely. If you uninstall the app, it removes the connections but doesn’t delete any data already in HubSpot. Always check your HubSpot fields before removing forms so you don’t lose important submissions.
Common Limitations and Best Practices
- Works best with simple forms; complex conditional logic requires a different approach.
- Form names must be unique across the site.
- Styling may need manual adjustments if your site design is highly customized.
- For high-volume sites, watch for performance or API limits.
- Always test new mappings and tracking setups to catch errors early.
The official app is convenient for basic lead capture and tracking. For conditional logic, progressive profiling, or bi-directional sync, you must use manual embedding or APIs/middleware.
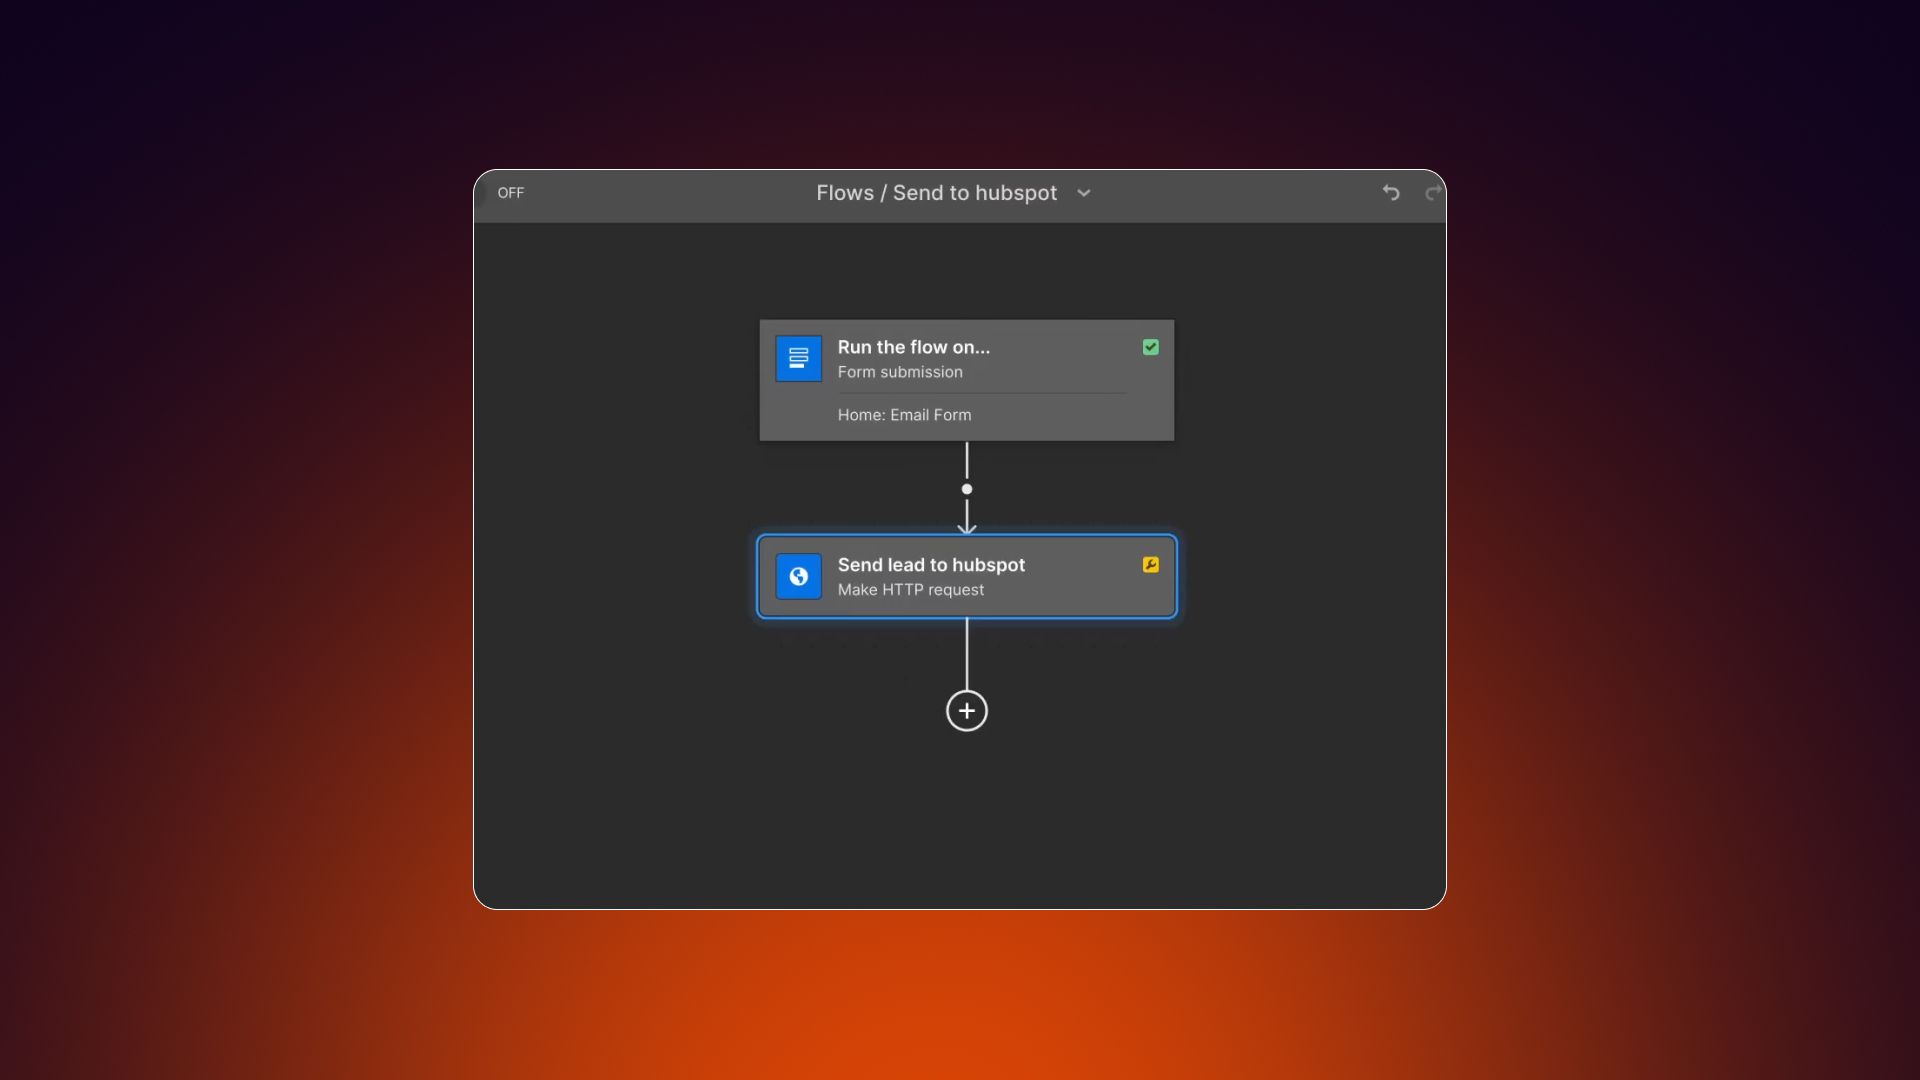
Manual Integration with Embedded HubSpot Forms
When you need full access to HubSpot features, manually embedding forms is usually the better choice. This lets you use conditional fields, smart content, and progressive profiling, while still controlling how the form looks and where it sits on your Webflow site.
When to Use Embed Integration
Use this approach if you need:
- Conditional fields or progressive profiling that the Webflow App can’t handle.
- Flexible design options. Using the Hubspot to Webflow app lets you build forms directly in Webflow, giving you more design control than embedding a form.
- Forms that live in specific page sections or dynamic CMS templates.
- HubSpot handles advanced tracking and custom validation. This is useful if you want form updates to sync automatically, any changes in HubSpot reflect on your site without re-mapping fields, unlike other methods where updates must be done in both places.
If your forms are simple and standard, the official app may be easier. Manual embedding is best when you need HubSpot logic to drive the form behavior.
Steps to Generate and Add HubSpot Form Code
In HubSpot, create your form or select an existing one.
- Go to the “Embed” option in the form settings.
- Choose the “raw HTML” or developer code option to avoid iframe restrictions.
- Copy the generated code.
- In Webflow, add an Embed element where the form should appear and paste the code.
- Publish or republish the page so the form becomes active.
This workflow ensures the form functions fully with HubSpot while giving you the ability to style it in Webflow.
Styling and Validation Tips
- Remove the default HubSpot iframe wrapper if you want your Webflow CSS to apply.
- HubSpot forms come with their own styles. It’s easier to use their templates and just change the colors, fonts, and spacing so it looks like your site, instead of trying to rewrite all the styles yourself.
- For complex layouts, test in multiple browsers and screen sizes.
- Keep an eye on HubSpot-specific validation rules; some fields require certain formats, and incorrect setups can block submissions.
Testing Submissions and Tracking
Before going live, run a full submission test:
- Submit the form as a test lead.
- Verify the contact appears in HubSpot with correct properties.
- Check that UTM parameters from the URL are captured by the form and appear in HubSpot, and ensure the tracking script is firing on every page.
- Confirm the HubSpot tracking script is firing properly, especially for chat or non-form interactions.
Connecting via APIs and Automation Platforms
.jpg)
When your workflows need more than simple forms or require conditional logic, using APIs or automation tools is the next step.
Platforms like Zapier and Make can move data between Webflow and HubSpot, trigger actions, and handle multi-step processes without you having to manually manage each submission.
How Zapier Connects HubSpot and Webflow
Zapier is a straightforward automation tool that links Webflow form submissions to HubSpot actions. You set a trigger, like a new form submission in Webflow, and then define what should happen in HubSpot, such as:
- Creating or updating a contact.
- Adding a contact to a list.
- Triggering a workflow or email sequence.
It’s easier to set up than custom code, but costs scale with the number of tasks processed, so high-volume sites can get expensive.
Automations You Can Build (Contacts, Deals, Lists)
Using Zapier, you can automate tasks like:
- Syncing every new Webflow lead to HubSpot contacts automatically.
- Creating a deal when a form indicates a purchase intent.
- Adding contacts to specific HubSpot lists based on page or form interactions.
- Sending internal notifications when high-value leads submit a form.
These automations free up time and reduce errors from manual data entry, while keeping your HubSpot CRM up to date.
Make.com Scenarios and Webhooks
Make (formerly Integromat) is better suited for complex, multi-step workflows. It works through webhooks:
- Webflow sends the form payload to a Make webhook in real time.
- Make processes the data, applies filters or conditional logic, and routes it to HubSpot or other tools.
- You can branch workflows so different submissions trigger different sequences.
This setup is best for companies with lots of leads or complex routing needs, for example, sending big-company leads to sales while smaller leads go into a nurturing workflow.
Setting Up Bi-Directional Sync
For advanced use cases, you might want data to flow both ways: Webflow updates HubSpot, and HubSpot updates Webflow. This usually involves:
- Serverless functions or scripts to process Webflow submissions.
- HubSpot APIs to pull CRM data back into Webflow CMS items.
- Dynamic page updates based on visitor history or lead status.
Bi-directional sync ensures that the website can display personalized content while HubSpot remains the source of truth for all contact data.
Field Mapping and Data Handling Best Practices
- Ensure field types match between Webflow and HubSpot (text, date, dropdown, boolean).
- Test every form and workflow before going live.
- Use clear naming conventions for forms and fields to prevent conflicts.
- Monitor logs or reports in Zapier/Make to catch errors quickly.
- For high-volume environments, consider batching updates to reduce API calls and avoid hitting rate limits.
Using APIs or automation platforms adds flexibility, but it also adds complexity. Proper planning, testing, and ongoing monitoring are key to keeping your integration reliable.
Managing Forms and Data Sync
Once your forms are live, keeping data clean and consistent is critical. Without a clear approach, submissions can get miscategorized, duplicates can appear, and tracking may break.
Mapping and Naming Fields
Each form field in Webflow should correspond exactly to a HubSpot property. Pay attention to field types, text, dropdown, multi-select, date, because mismatches can cause data errors.
Use a clear naming convention for every form and field. For example: {PageName}-{FormPurpose}-{Date}. This prevents conflicts if you have multiple forms on dynamic pages or copies of templates. Unique names also make it easier to troubleshoot mapping issues later.
Tagging, Lists, and Lifecycle Stages
In HubSpot, leads can be organized with tags, lists, or lifecycle stages. Set these up carefully so contacts automatically go into the right campaigns or pipelines. For example, a “Request Demo” form could tag the lead as Demo Request and add them to a list for follow-up emails.
UTM Parameters and Source Attribution
Accurate tracking works by capturing UTM parameters from your campaigns and page URLs. Make sure HubSpot’s tracking code is installed correctly and that forms keep these UTM values. If parameters are missing, conversions might show up as direct traffic, hiding what’s really driving results.
Avoiding Duplicates and Data Conflicts
Duplicates happen when a contact submits multiple forms, or field mappings aren’t consistent.
To prevent this:
- Always use unique form IDs.
- Enforce consistent field mapping.
- Regularly audit submissions for inconsistencies.
- For high-volume environments, consider deduplication rules in HubSpot based on email or another unique identifier.
Managing forms and data isn’t glamorous, but it’s essential. So you may wanna clean field mapping, clear naming, and careful tracking to keep your HubSpot database reliable ensuring your Webflow gets you results.
Pros and Cons of Each Method
Below you can find a breakdown of the main pros and cons for each method of connecting Webflow forms to HubSpot, so you can quickly see which approach fits your needs.
HubSpot App
- Easy to set up
- Easy to style forms
- Requires mapping fields every time you update a form
- Harder to recreate and track hidden fields like UTMs
- Can break functionality if you accidentally change field IDs in Webflow
Zapier
- Same as HubSpot App
- Adds extra logic if you want to send data to HubSpot and other platforms at the same time
- Useful for advanced integrations
Embed
- Longer setup initially
- Styling requires CSS knowledge; some fields like select menus and sliders are tricky across browsers
- Once set up, easy to reuse across the site and add multiple forms
- Updates in HubSpot automatically appear on the live site
- Very reliable and unlikely to break
- Comes with built-in validation for emails, phone numbers, etc., which the other two methods don’t provide (you’d have to write validation manually)
Tracking, Analytics, and Chat Setup
To get the most out of HubSpot, your tracking and chat features need to be properly installed and tested. These elements feed data into your CRM, powering reporting, automation, and personalization.
Adding HubSpot Tracking Code to Webflow
- Copy the HubSpot tracking code from your account (Tracking & Analytics > Tracking Code).
- In Webflow, go to Project Settings > Custom Code > Head, and paste the script.
- Publish the site to ensure the code is live on all pages.
- Verify it’s working by checking HubSpot’s real-time analytics or using browser developer tools.
The HubSpot tracking code must be placed in Webflow’s global head section (Project Settings > Custom Code > Head). Missing or incorrectly placed scripts will break form submissions, chat, and attribution tracking.
Configuring Chatbot and Targeting Rules
HubSpot chat can live on your Webflow site as a widget or embedded code.
Once installed:
- Set targeting rules for which pages or segments see the chat.
- Configure triggers such as inactivity or scroll percentage.
- Test behavior to ensure it appears at the right time for visitors.
The chat relies on the tracking code, so double-check it fires correctly before troubleshooting chat issues.
Testing Contact Timelines and Event Data in HubSpot
After forms and chat are live:
- Submit test leads and interact with chat.
- Check the contact timeline in HubSpot to confirm events appear in the correct order.
- Verify custom fields, lifecycle stages, and tags populate accurately.
This step confirms that your integration captures data as expected and informs workflows or automated follow-ups.
Building Campaign and Attribution Reports
With tracking in place, HubSpot can generate reports showing:
- Which forms or pages drive conversions.
- Campaign performance across multiple channels.
- Lead sources and revenue attribution.
Consistent reporting depends on proper UTM capture and accurate field mapping. Regularly review reports to ensure metrics match expectations and correct any discrepancies quickly.
Troubleshooting and Maintenance
Even a well-planned integration can run into hiccups. The key is knowing where to look and how to fix issues without disrupting live data.
Form Submissions Not Syncing
If submissions aren’t reaching HubSpot:
- Verify the tracking code is installed correctly and firing.
- Check form names and IDs for uniqueness, duplicate names can break mappings.
- Confirm that field types in Webflow match HubSpot properties.
- Test the form on a published page, not just in preview mode.
Field Mismatches or Missing Data
Data can go missing if HubSpot properties don’t align with Webflow fields.
Potential solution:
- Match types carefully: text, date, dropdown, multi-select, boolean.
- Update mappings in the app or automation tool whenever form fields change.
- Run test submissions after each change to confirm data flows correctly.
Styling or Embed Conflicts
When manually embedded forms look off:
- Make sure you are using raw HTML instead of the iframe option.
- Apply Webflow CSS classes or custom styles to maintain consistency.
- Check for conflicting JavaScript that could block form submission or chat widgets.
Tracking or Attribution Issues
Lost UTM or source data usually comes from:
- Missing or improperly placed HubSpot tracking code.
- Form submissions not preserving URL parameters.
- Middleware scripts not handling the data correctly.
Always test with different browsers and devices, and verify entries appear correctly in HubSpot timelines.
Safe Uninstalling and Reconfiguration
If you need to remove or redo the integration:
- Disconnect forms in the Webflow App before uninstalling.
- Backup all field mappings and automation workflows.
- Remove tracking scripts carefully and republish pages.
- Reinstall or re-embed forms step by step, testing at each stage.
Regular maintenance, combined with careful testing and monitoring, keeps your Webflow-HubSpot integration reliable and prevents surprises down the line.
Working With Integration Partners
For some teams, handling Webflow-HubSpot integration entirely in-house works fine. For others, especially larger or more complex setups, bringing in outside help can save time and prevent costly mistakes.
When to Bring in Experts
Consider external help if you need:
- Advanced conditional logic or multi-step workflows.
- Bi-directional sync between Webflow CMS and HubSpot Custom Objects.
- Middleware or API setup that your team doesn’t have the bandwidth or expertise to manage.
Specialized partners can also provide guidance on best practices, governance, and scaling strategies.
Integration Setup and Audit Services
Integration partners can:
- Set up new connections between Webflow and HubSpot from scratch.
- Audit existing integrations to identify broken mappings, duplicate fields, or tracking gaps.
- Standardize naming conventions and field mappings to prevent errors.
A thorough audit often catches issues before they affect live data, saving hours of troubleshooting later.
Continuous Optimization and Reporting
Beyond initial setup, partners can support ongoing maintenance:
- Monitor workflows and automation to ensure reliability.
- Update mappings when forms or HubSpot properties change.
- Build and refine reports to improve attribution, campaign tracking, and lead management.
Working with experts doesn’t replace internal knowledge, it complements it, giving teams a safety net and a faster path to a robust, scalable integration.
Key Takeaways
1. Pick the simplest method for your business: If you just need basic lead capture and tracking, use the official Webflow HubSpot App. If you need advanced logic or handle lots of leads, go with manual embeds, middleware, or a custom API. Keep it as simple as possible.
2. Standardize names and UTMs: Give each form a unique name, use clear field labels, and keep UTM parameters consistent. This prevents mistakes, duplicates, and lost tracking.
3. Test everything: Make sure every form submission, chat message, or automation shows up correctly in HubSpot and triggers the right workflows.
4. Document your setup: Keep a record of form mappings, automation steps, API connections, and maintenance tasks. Documentation makes updates, fixing issues, and scaling much easier.
Following these steps keeps your Webflow-HubSpot integration reliable, easy to manage, and ready to grow as your site or marketing needs change.
FAQ
Can I Use My Existing Webflow Forms With HubSpot?
Yes. The official HubSpot App lets you link your Webflow forms to HubSpot contact fields. Give each form a unique name, republish the page after any changes, and test submissions to make sure the data flows correctly.
How Do I Add HubSpot Tracking and Chat to Webflow?
Install the HubSpot tracking code in Webflow under Project Settings > Custom Code > Head. Publish your site, then add chat widgets either through the app or by embedding HubSpot’s code. Test by submitting a form and checking the contact timeline in HubSpot.
What’s the Difference Between Embedding and Mapping Forms?
- Mapping (official app): Links your Webflow form fields to HubSpot fields via the app. Quick, simple, good for basic forms.
- Embedding: Places a HubSpot form directly on your page using code. Needed if you want HubSpot features like conditional logic, smart fields, or progressive profiling while keeping full design control.
Can I Create Deals or Tickets From Webflow Submissions?
Yes, but the app only creates basic contacts. To make deals, tickets, or trigger multi-step workflows, you need middleware like Zapier or Make, or a custom API setup.
How Do I Prevent Duplicates?
- Give forms unique names and IDs.
- Match Webflow fields exactly to HubSpot properties.
- Set deduplication rules in HubSpot using email or another unique identifier.
- Check submissions regularly for mistakes.
Can I Personalize Webflow Pages Using HubSpot Data?
Yes. With two-way syncing, you can pull HubSpot data into Webflow CMS items using serverless functions or APIs. This lets you show dynamic content based on lead score, membership tier, or other HubSpot properties.
Do I Need Zapier or Make if I Use the Official App?
Not for basic forms or tracking. The app covers simple lead capture, chat, and asset syncing. Zapier or Make is only needed for conditional logic, multi-step workflows, or complex data transformations.
What’s Different for Webflow Enterprise?
Enterprise setups often use headless CMS, large dynamic content, custom objects, and two-way data flows. They usually need APIs or serverless functions for CMS sync and advanced automation, plus stricter security and governance.
How Can I Safely Uninstall or Switch Integration Methods?
- Disconnect forms or workflows in the Webflow App first.
- Backup all field mappings and automation logic.
- Remove tracking scripts carefully and republish pages.
- Reinstall or switch to a new method step by step, testing forms and tracking at each stage.
.jpg)